|
|
|

This tutorial is for PSP7 and no other filters are needed.
The tutorial is broken up into
several different pieces.
I literally took a tape apart to see how it was put together,
then made each piece. I originally did this about a year ago.
I have tried to recreate it as
best as I can remember.
This is for advanced users of PSP. REMEMBER----Save often!
Open a new image, 200x200, transparent background.
Add a new layer and name it 'Spool'.
Using your selection![]() tool set to circle, antialias checked,
tool set to circle, antialias checked,
draw a circle starting at 100,100
to 192,192.
Flood![]() Fill with color #C0C0C0.
Fill with color #C0C0C0.
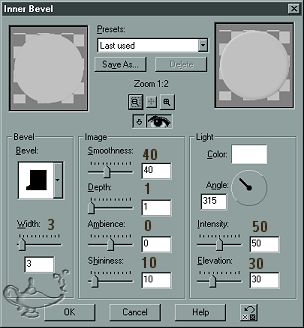
Go to Effects>3D effects>Inner bevel and apply the following settings.
Reduce the opacity of this layer to 50%. Deselect.
Add a new layer and name it 'Hub'. Using
your selection tool
make another circle from 100,100 to 133,133. Flood fill with white.
Add a new layer and call it 'Groove'. Make your foreground color black,
and make sure your second style is set to null.
Using your Shapes![]() Tool,
Tool,
with elipse selected,
antialias checked, vector unchecked,
and line width set to 3, hold your shift key down and with your
right mouse button,
make a circle from 100,100 to 126,126. Go to Selections>Select all, then
with your magic wand, left-click on the circle to select it. Go to Selections>Defloat.
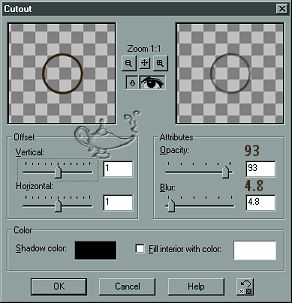
Go to Effects>3D effects>Cutout and apply with the following settings.
Deselect. Hide Layer 1 and spool, then make hub the active layer.
Go to Layers>Merge Visible to merge hub and groove.
Rename this layer Hub.
Apply an inner bevel to the hub layer using the same settings as before.
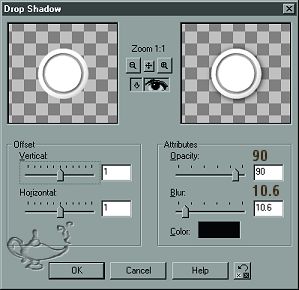
Go to Effects>3D effects>Drop Shadow and apply with the following settings.
Make Layer 1 the active layer, add a new layer and name it 'Film'.
Make a circle selection from 100,100 to 180,180.
Make your foreground color #362612 and your background color #69583F.
Flood fill the selection with a sunburst gradient using the following settings:
Gradient=Foreground-Background, Horizontal and Vertical at 50, repeats at 70.
Go to Colors>Adjust>Brightness/Contrast and set
the brightness at -53, contrast at 0 and apply.
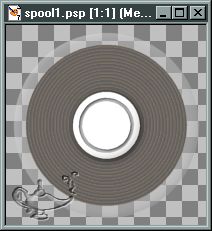
Deselect. Hide film and layer 1, then merge visible hub and spool.
Rename the layer 'Spool'.
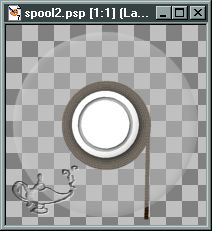
You should have something that resembles the picture below.
Now, make sure the spool layer is active. Copy and paste it as a new image.
Go back to your original and merge visible all layers. Save and minimize.
Go to your new image and go to Image>Canvas size
and increase it to 200x200, with both center tags checked.
Make a new layer and move it to the bottom and name it 'Film'.
With your selection tool make a circle from 100,100 to 144,144.
Flood Fill it with the same sunburst gradient with the same settings.
Darken using the same settings. Make a new layer on top of the film layer
Make sure your gradient settings are in the first style box.
Using the Line![]() Tool, single line, width at 3, draw a line
Tool, single line, width at 3, draw a line
straight down from the edge of the film.
Since it is on a separate layer, you can move it
around to get it in the right place.
Merge visible all layers and save and minimize.
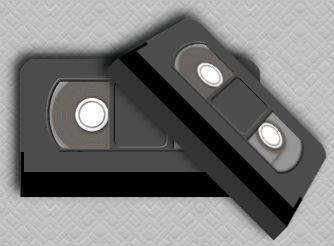
This spool should resemble the picture below.