Valentines Day is coming soon. What better gift than some chocolate covered cherries? Get ready to make
a virtual one to send to your valentine.
Tools needed: PSP 7.04 KPT5 KPT6 KPT5 preset, which you can get Here.Very good knowledge of PSP7
Open a new image 400x400, 16million colors, transparent background.
Using your selectiontool, set at elipse (antialias checked),
make an oval in the center of your canvas. It doesn't matter about what size, but the bigger the better.
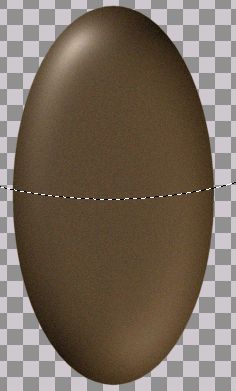
Floodfill it with a medium to dark brown. I used
#4B3115
Go to Effects>Plugins>KPT5>Shapeshifter and apply the magi-ss preset.
Go to Effects>Noise>Add Noise and set it to 6 and uniform. Apply. Deselect.
Using your selection tool, same settings, make another oval. We are cutting off the bottom of the first oval, so it will look more like a peice of candy.
So make your oval cover the top part of the first oval and slice thru about midway. Something like this.
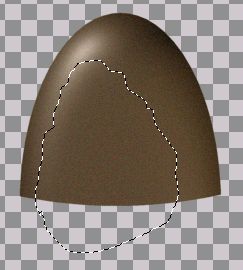
Now, go to Selections>Invert and invert your selection and hit your delete key. Deselect.
Now you can move your 'cherry' closer to the middle of the image.
Duplicate this image and minimize it.
Using your Freehandselection tool, set at freehand(antialias checked), make a selection on your cherry that looks like a bite.
See below.
Hit your delete key. Deselect.
Duplicate this layer. Make your original layer active and go to Colors>Adjust>Brightness/Contrast.
Adjust the brightness to -68 and contrast to 0, apply. Now, make the duplicate layer active and move it to the left a little bit.
We are just trying to give the chocolate some depth here.
Now you can either merge the 2 layers as they are, or you can get rid of the right edge of the darker layer using your eraser. It is entirely up to you.
Whichever, you choose, after you merge the layers, rename the merged layer 'chocolate'.
Now that we have the chocolate shell, let's fill it up. Save your work and go on to part 2.