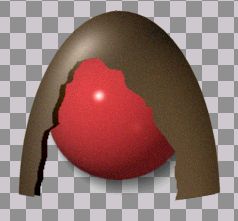
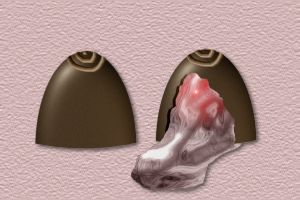
Part 2 is the easiest part. This is where we put the cherry in. The cherry I used isn't really a cherry at all, but it was the right color.
Make a new layer and name it 'cherry'. Move it below the chocolate layer.
The tube I used came with psp. It is called Colored Spheres and I used the red one of course. In the tool options for picture tube,
choose the Colored Spheres and set the size at about 150.
Now put the tube on the cherry layer. You may have to use the deformation tool to conform it to the chocolate. Once you have it like you want it,
you are thru with part 2. Your image should look something like below.
Depending on your color settings, you may find that you need to add a bit of noise to your cherry. Just select your cherry and add 6 noise.
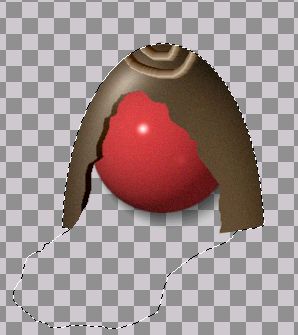
Now in Part 3, we are going to add the goop or syrup to the cherry. This is where the fun begins, :)
Make a new layer and name it Goop. Move this layer in between the chocolate and cherry layers.
Make your chocolate layer active and go to Selections>Select all. Using your magic wand, click on the chocolate to select it.
Now with your freehand selection tool set to freehand, add the cutout part and a goopy shape below and slightly toward the left. See below.
Now make your Goop layer active.
Go to Effects>Plugins>KPT6>KPTgel. Go to the presets and choose the last one in the first row of Gel Basics. It should look like this.
Now just start playing with it on your canvas til you get something goopy looking. Appy. Deselect.
In the layer pallette, set the blend mode to Lighten and reduce the opacity to about 90.
With your Goop layer active, use Select All and your magic wand to select the goop.
Flood fill it with #BE3E3F. In the Flood Fill options, set the blend mode to Color and reduce the opacity to about 22.
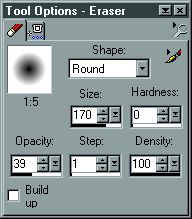
Now you may have a little piece of chocolate hanging over the goop on the bottom left edge. If so, erase it so that the goop looks like it is running out of the cherry.
Make your goop layer active and with your eraser tool, set up like below, click twice where the cherry is.
Okay, we are almost done. All we need to do is make the little decoration on top.
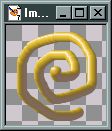
Open a new image, 100x100, 16million colors, transparent background.
Here we are using another default tube. Click on picture tube and in the tool options find 3D Gold. Set the scale to 18.
Now using that tube draw a swirl like this.
Using select all and your magic wand, select the swirl. Using the same settings as before flood fill it with the same medium brown.
Go to Colors>Adjust>Brightness/Contrast and using the same settings as before, apply it. Deselect. Flip the image.
Copy the swirl and paste it as a new layer on top of the chocolate layer of your cherry. Adjust it so that only half of the swirl sits on top of the chocolate at the top.
Make your chocolate layer active and select the chocolate. Invert the selection.
Make your layer with the swirl on it active. Contract the selection by 1 then feather the selection by 1 and hit your delete key.
Merge all layers. Make a new layer and move it to the bottom. Flood fill it with the background or pattern of your choice.
Open up your plain chocolate peice that you minimized earlier. Add the swirl to it like you did with the other one. Now you have a whole one and one with a bite taken out.
Congratulations!!!!
With all the variations in this tutorial, you will never be able to make 2 identical cherries. Have Fun!!!