
Tools Needed:
PSP 7.04
Eye Candy 3.01
Popsicle stick from Popsicle Tutorial
My Presets |
Put the .sel files into your selections folder (you may have to create one).
The .pbs and .pbv files go into your presets folder. |
- Open a new image, 400x400, 16million colors, transparent background.
- Make a new layer and name it 'Shell'.
- On your Shell layer go to Selections>Load from disc and choose browny.sel.
- Floodfill it with #34241f. Deselect.
- Go to Selections>Load from disc and choose brownyhalves.sel.
- Go to Effects>3D Effects>Outer Bevel and use the browny preset. Deselect.
- Go to Effects>3D Effects>Inner Bevel and use the browny2 preset.
- Make a new layer and name it 'Ice Cream'.
- Load the browny.sel again, contract it by 3 and save it to alpha channel.
- Floodfill the selection with #f8f0f0. Deselect.
- Go to Effects>Artistic Effects>Brush Strokes and use the ice cream preset.
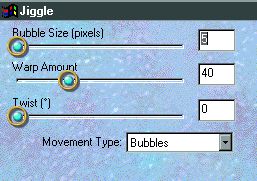
- Go to Effects>Plugins>Eye Candy 3.01>Jiggle and set it up like below.
- Using the deformation tool, stretch the ice cream out beyond the edges of the shell.
- Load the selection from the alpha channel, invert the selection and hit your delete key.
- Move your Ice Cream layer below your shell layer.
- Duplicate your shell layer and rename the new layer to 'bottom shell'.
- Mirror the bottom shell.
- Move it below the ice cream layer, lining it up with the shell layer.
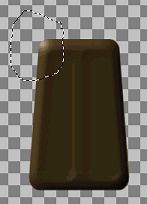
- Make your shell layer active. Using your freehand selection tool, set to freehand, make a bite shape. See below:
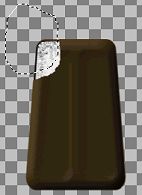
- Hit your delete key.
- Now use your mover tool and your right-click button to move the selection to the left and up a bit. See below:
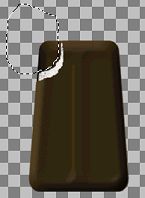
- Make your Ice Cream layer active and hit your delete key.
- Now move your selection once again. Just a few pixels up and to the left. See below:
- Make your bottom shell active and hit your delete key.
- Save your work.
- Hide Layer1 and merge visible the other layers. Rename this layer BrownBar.
- Open up the popsicle stick that you saved from the popsicle tutorial.
- Copy it. Make your browny bar active and highlight Layer1. Paste the stick as a new layer.
- Position the stick so it is in the center of the bar, you may have to cut the top off the stick.
- With the stick layer active, make a new layer and name it 'shadow'.
- Make your shadow layer active and load your selection from alpha channel.
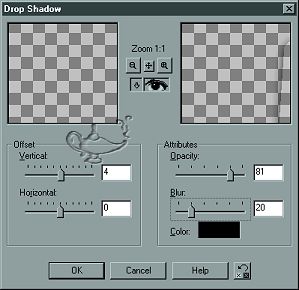
- Go to Effects>3D Effects>Drop Shadow and apply it like this:
- Make the stick layer active and using your magic wand, select anywhere in the transparent area.
- Make your shadow layer active and hit your delete key.
- Save your work.
- Hide Layer1 and merge visible the other layers.
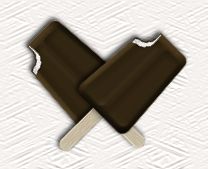
- Congratulations, you have now made a browny bar!!!!!
Tutorial Index
Website design ©Bluegenie2 Designs
|